Showing posts with label Appetizers. Show all posts

Cheesy Ranch Spinach Dip Recipe

by
This Cheesy Ranch Spinach dip recipe is packed with spinach and peppers and fully loaded with delicious ranch flavor!  It can easily be prepped ahead of time for a delicious dip perfect for any party!


How to Make Spinach Dip
This dip is easy to make and has so much great flavor! Here are a few tips to make sure you have spinach dip perfection!


  • Use a hand mixer to combine the cream cheese, this makes it softer and easier to scoop.
  • Squeeze all of the water you can out of the spinach.
  • Change the cheeses to your favorites, a bit of gruyere or cheddar are great in this recipe.
  • Low fat or light products can be used in this recipe.
  • Make up to 48 hours in advance and refrigerate. May need a bit of extra cook time if it’s chilled.
  • Make Ahead Spinach Cheese Dip
  • Not only is it perfect for any gathering,  this spinach dip recipe can actually be prepared a day in advance and put it in the oven just before serving!
  • Either take it out of the refrigerator 30 minutes before baking or add a few minutes extra bake time.


Ingredients


  • 2 bunches spinach washed
  • 8 oz cream cheese
  • 1/2 cup sour cream
  • 1/2 cup mayonnaise
  • 1/4 cup sliced green onion
  • 1/2 cup diced red pepper
  • 1 packet Hidden Valley Ranch Mix
  • 1 1/2 cups mozzarella cheese divided
  • 1/4 cup parmesan cheese


Instructions

  1. Preheat oven to 350°F.
  2. Wash and roughly chop spinach. Place in a non-stick pan over medium heat until cooked. Cool completely. Once cooled, squeeze as much liquid as possible out of the spinach.
  3. Combine cream cheese, sour cream, mayonnaise and ranch mix with a hand mixer until fluffy.
  4. Fold in remaining ingredients except 1/2 cup of mozzarella and spread into a 2 quart casserole dish. 
  5. Top with remaining cheese and bake uncovered for 25-30 minutes or until hot & bubbly.

The BEST Buffalo Chicken Dip

by
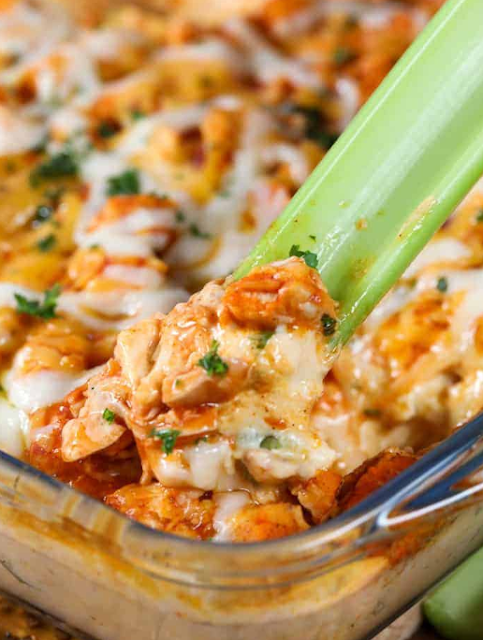
Buffalo Chicken Dip is one of the best ever party snacks! Tender chunks of chicken in Buffalo sauce is combined with a creamy cream cheese base and of course loads of cheese.  This buffalo chicken dip is baked until golden and bubbly!


This is the first thing gone at every party, low carb and keto friendly (and everyone begs for the recipe)!

How to Make Buffalo Chicken Dip
Buffalo Chicken Dip is quick and easy to make and everyone loves it!

Combine chicken and buffalo sauce.
Mix cream cheese, sour cream and seasonings.
Stir in chicken, celery and cheese. Add toppings and bake.
This chicken wing dip starts with tender juicy chunks of chicken! You can use leftover cooked chicken or make easy poached chicken. Rotisserie chicken will also work great but in a pinch you can even use canned chicken.  Note: If you are using canned chicken, you’ll want to be extra gentle when mixing as the chicken can break apart quite easily. While some recipes use shredded chicken, I prefer the texture of the chopped chicken.

Like most dips (including my fave 5 Minute Taco Dip), cream cheese is the base of this recipe. Softened cream cheese makes for a better dip. (TIP: To soften cream cheese quickly, microwave it for about 15 seconds on high). Using a hand mixer for the base any cream cheese dip keeps it fluffy so it doesn’t break your tortilla chips for dipping! I add 3/4 cup sour cream to this recipe, feel free to replace it with Ranch dressing or even Blue Cheese dressing if you’d prefer.

Finally we add in some seasonings, I chose both green onion and garlic powder (in place of white onion and fresh garlic) as the flavors are a bit milder and blend well in this recipe. We spread this into a pan and bake until bubbly and melty…. so incredibly good!


Ingredients


  • 2 cups chicken breasts cooked
  • 2/3 cup buffalo sauce
  • 8 oz cream cheese softened
  • 2/3 cup sour cream
  • 2 ribs of celery finely diced
  • 2 green onions sliced
  • 1 teaspoon garlic powder
  • 1 cup shredded cheddar cheese divided
  • 1 cup shredded mozzarella cheese divided


Instructions

  1. Preheat oven to 350 degrees.
  2. Combine diced chicken and buffalo sauce in a small bowl. Set aside.
  3. In a large bowl, combine cream cheese, sour cream and garlic powder with a mixer on medium until fluffy.
  4. Add celery, chicken, 1/2 cup cheddar cheese, 1/2 cup mozzarella cheese and green onions.  Stir to combine. 
  5. Spread into a 9x9 pan, top with remaining cheese and bake 20 minutes or until bubbly.

Gooey Cheese Sticks (Fried or Baked)

by
Homemade Cheese Sticks are one of the crispy finger foods I crave the most (along with Oven Baked Potato Skins)! The first bite begins with a deliciously crispy outer coating followed closely with a surprisingly soft, gooey and cheesy middle. Serve them with homemade marinara sauce for an appetizer the whole family will love!


How to Cook Cheese Sticks
These Cheese Sticks will have the best results deep fried, it makes them crispy and delicious. They can be baked in the oven or cooked in the air fryer but the best results come from frying! When baking or air frying, a bit of the cheese may leak out, this is normal and they’ll still be delish!

To Bake Cheese Sticks: 

  • Spray cheese sticks with cooking spray. Preheat oven to 400°F. Bake 9-11 minutes or until crumbs are crisp and cheese is melted.
  • To Cook Cheese Sticks in the Air Fryer: Preheat air fryer to 400°F. Cook cheese sticks in small batches for 4-6 minutes or until crumbs are crisp and cheese is melted.
  • Cheese Stick Do’s & Don’ts
  • Cheese: Purchase cheese strings and not just mozzarella as they melt differently.
  • Freeze: Completely freeze your cheese before you begin, this keeps it from leaking out during cooking.
  • Crumbs: Take extra care to press the breadcrumbs into each cheese stick. You want the oil to get at the breadcrumbs, not the cheese inside!
  • Cook Time: Do not  overcook your cheese sticks, you just want the breading to get crispy. If they cook too long, the cheese will melt and begin to ooze out.

WARNING: If the cheese is not fully coated (or you use cheese sticks and not strings) the cheese can leak out of the coating causing hot oil to splatter.


Ingredients


  • 16 Mozzarella string cheese sticks must be string cheese
  • 1/2 cup flour
  • 1/4 cup corn starch
  • 2 eggs
  • 2 tablespoons olive oil or vegetable oil
  • 3/4 cup Italian bread crumbs
  • 1/2 cup Panko bread crumbs
  • oil for frying


Instructions

  1. Open the cheese strings and cut each in half. Cover and place in the freezer for at least 2 hours or until completely frozen. 
  2. Combine flour and cornstarch in a small bowl. Combine the Italian and Panko bread crumbs in a separate shallow dish. In third small bowl, whisk eggs and olive oil until well combined.
  3. Dip each cheese stick half into the egg mixture and then gently roll into the flour mixture.
  4. Put back into the egg mixture and roll until coated. Finally, place into the bread crumbs pressing the crumbs on each piece of cheese to make sure it's coated all around so the cheese doesn't leak out.
  5. Place in the freezer while the oil preheats. Preheat oil to 350 degrees. It should be hot enough that a few crumbs dropped into the oil will bubble.
  6. In small batches, place breaded cheese sticks into the hot oil for about 2 minutes or just until browned. Do not overcook or the cheese will leak out.
  7. Serve hot with warm pasta sauce.

Chicken Street Tacos

by
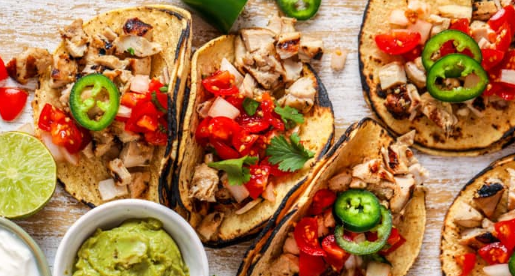
Street tacos can be found in almost any Mexican restaurant throughout the cities across America. Simple but packed with flavor, grilled marinated chicken and your favorite toppings are tucked into soft corn tortillas.


To Serve Street Tacos

These little bundles are often served in twos or threes, so keep the size of the tortilla small, 6 to 8 inches. If you can find them, our store sells little mini 4″ tortillas which are perfect for appetizer night! Tortillas are usually doubled up when serving (this is optional) because corn tortillas can sometimes tear or break and this’ll keep all of the filling in.

I usually heat the tortillas right on the grill or over the gas stove directly over the flame for a few seconds.

How to Make Street Tacos
Making the best street food right at home is as easy as can be!

Prepare the chicken in the marinade before you leave for work so the chicken is seasoned and super tender! Then serve with a Mexican style salad and fun drinks for a perfect evening.

Prepare the marinade, add chicken and refrigerate at least one hour.
Grill chicken until no pink remains, then chop into 1/2” pieces.
Fill your tortillas (and your plate) and enjoy!
To serve, scoop a little chicken in the center of each taco and then add toppings as desired.

I find chicken thighs always come out juicy but if you prefer, you can use grilled chicken breasts in place of thighs.


Ingredients


  • 1 lb chicken thighs boneless, skinless
  • 1 teaspoon cumin
  • 1 teaspoon oregano
  • 2 tablespoons lime juice
  • 1/4 cup orange juice
  • 2 cloves garlic minced
  • 3 tablespoons olive oil

For serving

  • corn tortillas
  • cilantro
  • pico de gallo


Instructions

  1. Combine chicken, cumin, oregano, lime juice, orange juice, garlic, and olive oil in a bowl. Marinate at least 1 hour or up to 4 hours.
  2. Grill chicken over medium heat until no pink remains, about 4 minutes per side.
  3. Once cooked, remove chicken and rest 3 minutes. Chop into 1/2" cubes.
  4. Meanwhile, warm tortillas in the microwave or on a skillet. Top tortillas with chicken and toppings as desired.

CREAMY WHITE BEAN AND SPINACH QUESADILLAS

by


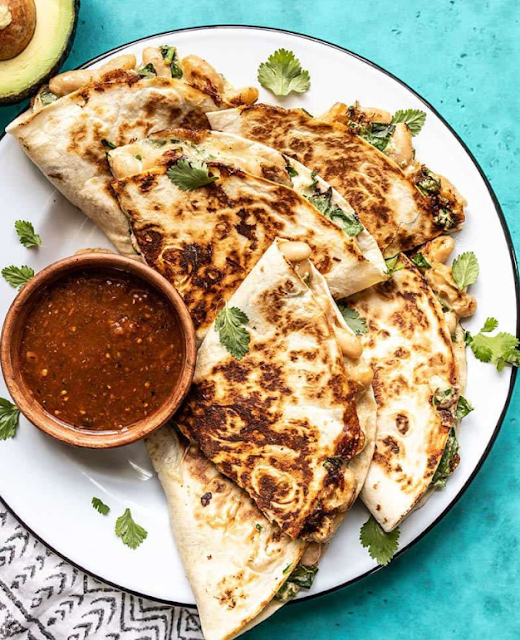
This is like, “the week of quesadillas” at my house. LOL. When the concept for these super easy creamy quesadillas first came into my head I couldn’t decide whether to make them with chicken or do a vegetarian version, so I just made both! While I love both versions of this quesadilla, the incredible ease and low cost of these Creamy White Bean and Spinach Quesadillas might make them the winner. They literally only take about 20 minutes and are so freaking good. 


HOW TO SERVE CREAMY WHITE BEAN AND SPINACH QUESADILLAS
Because the filling for these quesadillas is so rich and creamy, they really benefit from being served with a nice tangy salsa. The salsa I used is a smoky chipotle red salsa, which paired so well with the flavors of the quesadillas. Normally quesadillas would be served with some sour cream or guacamole dolloped on top, but there is so much creaminess already that I think that would be overkill.


INGREDIENTS

  • 1 15oz. can cannellini beans 
  • 3/4 tsp chili powder 
  • 1/4 tsp cumin 
  • 1/8 tsp garlic powder 
  • 1/8 tsp salt 
  • 2 cups fresh spinach 
  • 4 oz. pepper jack cheese, shredded 
  • 1/2 cup sour cream 
  • 4 8-inch flour tortillas 

INSTRUCTIONS

  1. Rinse and drain the cannellini beans well. Once well drained, transfer them to a bowl and add the chili powder, cumin, garlic powder, and salt. Stir to combine the beans with the spices.
  2. Roughly chop the spinach into smaller pieces. Add the spinach, cheese, and sour cream to the bowl with the beans, then stir to combine.
  3. Divide the spinach and bean mixture between the four tortillas, then fold them in half to close.
  4. Cook the quesadillas, one or two at a time, in a skillet* over medium heat until the tortillas are brown and crispy and the filling is melted and gooey (3-5 minutes each side).
  5. Cut the quesadillas in half, then serve.

NOTES
*I cook my quesadillas in a dry skillet (they don't stick), but you can use oil if you prefer a more fried texture to the tortillas.

BEST EVER AVOCADO DIP

by
I’m a little avocado obsessed, so when I went to a little Latin American Restaurant last year, La Macarena Pupuseria,  and the waiter claimed they had the best guacamole ever, I took the bait—hook, line, and sinker. I had to find out what was so special about this reportedly amazing guac. Well, let me just tell you, this was not only the best guacamole I had ever had, but it was also the most unique. As I enjoyed the uniquely spicy and sweet flavor, I tried to dissect the ingredients. I could tell there were bits of sweet pineapple, chunks of hard boiled eggs, and a healthy dose of sriracha on top. What more could a girl ask for? Those are three of my favorite ingredients all together in one super creamy dip. My only question is, why did it take me a whole YEAR before I tried to make what turned out to be the Best Ever Avocado Dip at home?! 
I added a little red onion to my dip for zing (I don’t remember if that was in the restaurant version) and a handful of fresh cilantro. Red onion can be fairly expensive, so if you don’t want to buy a whole onion just to use a quarter of it for this recipe, you can sub with a couple sliced green onions.
Whip up a big batch of this amazing dip tomorrow for Cinco de Mayo, have an ice cold margarita, and try not to blink because the dip will probably be gone before your eyes reopen.

INGREDIENTS
  • 3 ripe avocados
  • 1 8oz. can pineapple chunks, drained 
  • 1/4 small red onion 
  • 2 Tbsp Chopped fresh cilantro 
  • 1 Tbsp sriracha hot sauce 
  • 1/2 tsp salt 
  • 3 large hard boiled eggs 

INSTRUCTIONS
  1. Cut the avocados into chunks and place them in a bowl. Drain the canned pineapple chunks and roughly chop them into smaller pieces. Finely dice the red onion. Chop the cilantro
  2. Add the pineapple, onion, cilantro, and sriracha to the bowl with the avocado and mash everything together. Add salt to taste, or about 1/2 teaspoon.
  3. Chop the hard boiled eggs and stir them into the avocado mixture. Taste the dip and adjust the hot sauce or salt if needed. Serve immediately or refrigerate until ready to eat.

NOTES
Press a sheet of plastic wrap down onto the surface of the dip before refrigerating to prevent the top from turning black.

FRUIT SALAD WITH MARSHMALLOWS AND WHIPPED CREAM

by


This easy and delicious Fruit Salad with Marshmallows and Whipped Cream is one of our favorite appetizers or side dishes to serve with dinner. Okay, it's pretty much a dessert, but since it's called a salad with eat it with dinner and don't feel a bit bad about it!


INGREDIENTS

  •  1 can fruit cocktail in light syrup or fruit juices, drained
  •  1 apple, diced
  •  1 banana, sliced in half lengthwise, then into half-circles
  •  1 cup marshmallows
  •  3/4 cup raspberries or other berries
  •  1 cup heavy whipping cream
  •  2 tablespoons powdered sugar
  •  1 teaspoon vanilla

INSTRUCTIONS

  1. Combine the drained fruit cocktail, apple, banana, marshmallows, and raspberries in a large bowl.
  2. In a separate bowl, whip the cream with the powdered sugar and vanilla using a stand mixer or handheld mixer fitted with a whisk attachment until light and soft.
  3. Add the whipped cream to the mixed fruit and marshmallows and fold to combine. Serve immediately or keep chilled in the fridge. Best served the day it is made.

GRILLED CAPRESE PANINI

by


Grilled Caprese Panini takes a simple grilled cheese sandwich and elevates it to a whole other level! Made with summer-ripe, thick-sliced tomatoes, fresh creamy mozzarella, and flavorful fresh basil, all of the elements on a classic caprese salad are present in a delicious, toasted grilled caprese panini!


EQUIPMENT NEEDED TO MAKE A GRILLED CAPRESE PANINI
While it’s super helpful to have a panini press like this one to make these grilled caprese panini, you can pretty much the same effect using a grill pan.

Just heat your grill pan well, then place the panini in the pan and press down on the top of the sandwich for 20 seconds with another heavy pot or pan. Leave the pot or pan sitting on top of the sandwich while the bottom cooks and gets grill marks, then flip and repeat on the other side.


And if you don’t have a panini press or a grill pan, you can always just prepare this like a normal grilled cheese. Just be careful when flipping the sandwich to grill the second side that you don’t let all the insides of the panini slip out!

INGREDIENTS

  •  1 ciabatta roll or 2 slices sourdough bread
  •  2 slices fresh mozzarella
  •  1/2 tomato, sliced
  •  Handful of basil leaves
  •  2 tablespoons olive oil
  •  1 teaspoon balsamic vinegar
  •  Salt & Pepper, to taste

INSTRUCTIONS

  1. Slice the ciabatta roll in half. Brush the outside of the bottom roll with 1 tablespoon of olive oil and place on a hot panini press or grill pan.
  2. Layer the sliced fresh mozzarella, sliced tomato, and basil leaves, then drizzle with balsamic vinegar and season with just a little salt & pepper, to taste.
  3. Brush the top of the ciabatta roll with remaining olive oil and place over sandwich, then lower the panini press lid or place a heavy pan on top of the sandwich in the grill pan over medium heat and press down for 20 seconds, then leave the pan sitting on the sandwich as it cooks. You will need to flip the sandwich if using the grill press once the bottom is toasted in order to grill the other side. Grill until toasted to a golden brown and the mozzarella starts to get a little melted around the sides but is not melted completely through.

PHILLY CHEESESTEAK DIP

by


Philly Cheesesteak Dip is like a deconstructed Philly Cheesesteak Sandwich. Melty cheese, grilled peppers and onions, and tender beef come together in dippable form inspired by the famous sandwich!

HOW TO MAKE PHILLY CHEESESTEAK DIP

  • Start with the peppers and onions.  Saute the onions in a little butter over medium-low heat until they begin to caramelize, which will draw out their natural sweetness. Then add in the diced green bell pepper and continue to cook until softened. A little minced garlic gets added in at the end for good measure.
  • Use sliced and chopped deli roast beef to make this dip extra easy to throw together.  You could also use leftover steak, or go ahead and cook up a ribeye, if you prefer. Just slice your meat into bite-size pieces so that they mix into the dip well.
  • The real star of this dip is the hot, melty cheese.  Softened cream cheese gets mixed together with sour cream, provolone cheese, and the meat and veggies, then you can dump it all into a baking dish, or just do what I did and put it back into the skillet you used to cook the peppers and onions. Top it with some of the remaining provolone cheese and pop it in the oven to bake for 20-25 minutes until gooey and hot!


TIPS FOR THE BEST PHILLY CHEESESTEAK DIP RECIPE

  • This recipe calls for sliced deli roast beef, which makes it super easy since you don’t have to cook a steak to make the dip. But if you wanted to, you could sear a nice rib eye seasoned with a salt and pepper in a couple tablespoons of butter and oil in a hot skillet for 4-6 minutes on each side, then slice it into thin, bite-size pieces and use that instead. Or just use leftover steak if you happen to have one in the fridge.
  • If you don’t have provolone on hand, you could sub in mozzarella or even monterey jack instead, but it won’t be quite the same flavor or as true to the authentic philly cheesesteak experience.
  • Serve this with a thinly sliced baguette. My favorite baguettes are the ones from the Costco bakery – they are so good! You can toast them or serve them soft, which is how I like to do it. Pita chips, tortilla chips, pretzels, and even crisp veggies like carrots would be other good dippable vehicles for transporting this warm, cheesy deliciousness to your mouth as well.
  • You could sprinkle the dip with some chopped fresh parsley or even chopped green onions for a pop of color. I even had parsley on hand and meant to do that when I photographed this philly cheesesteak dip, but honestly got so excited about eating it that I totally spaced it and then before I knew it the dip was half gone. Oops.


INGREDIENTS

  •  1 large yellow onion, thinly sliced
  •  4 tablespoons butter
  •  1 1/2 tablespoons brown sugar
  •  1 large green bell pepper, chopped
  •  3 cloves garlic, minced
  •  1 teaspoon Kosher salt
  •  1 (8 ounce) pkg. cream cheese, softened
  •  1 cup sour cream
  •  1/2 pound deli roast beef, roughly chopped
  •  2 (8 ounce) packages sliced Provolone cheese, chopped

FOR SERVING

  •  Sliced baguette
  •  Tortilla Chips
  •  Pretzels
  •  Carrot sticks or other vegetables for dipping

INSTRUCTIONS

  1. Preheat oven to 375 degrees F.
  2. In a large bowl, beat the cream cheese with a mixer until smooth.  Add in sour cream.  Set aside.
  3. Melt the butter in a large skillet over medium to medium-low heat.  Add the brown sugar and onions and saute 10-15 minutes until caramelized.
  4. Add in the green pepper and garlic and cook for a few minutes more until peppers are tender. 
  5. Transfer the sauteed peppers and onions to the bowl along with the chopped roast beef and all about 1/2 cup of the provolone cheese.  Stir well until everything is combined. 
  6. Transfer the mixture to a pie plate, baking dish, or just use the oven-safe skillet used for sauteeing the vegetables.  Sprinkle with the remaining provolone cheese.
  7. Bake for 25-30 minutes until the dip is hot and bubbly, and the provolone cheese starts to slightly brown on top.  Serve immediately with sliced baguette, tortilla chips, pretzels, or veggies.

CHICKEN QUESADILLAS

by


These Chicken Quesadillas made with leftover rotisserie chicken are one of my go-to, easy dinner ideas for busy weeknights!  When I want to make something that my whole family will eat but I don't have much time or energy left for any REAL cooking, it's this chicken quesadilla recipe to the rescue.  The edges are nice and crispy with loads of melted cheese inside!

CHICKEN QUESADILLAS

  • I’m pretty sure the first time I ever had a quesadilla was the summer before 4th grade. My family had moved from Nebraska to California and we went out to eat at a Mexican restaurant, which was still a novelty for us back then (it was the 90’s and Nebraska didn’t have a ton of Mexican restaurants, okay?). I distinctly remember my brother ordering a quesadilla off the menu, only he pronounced it “kwes-uh-dill-uh”. (It’s “cay-suh-dee-yuh”, just to be clear.) 


WHAT’S THE BEST CHEESE FOR QUESADILLAS?

  • The best cheese for quesadillas is one that melts well and has good flavor. I find that using more than one variety of cheese makes for the best quesadillas.
  • Montery Jack, colby jack, and mozzarella are good choices because they melt really well, but by themselves they are a little boring in a quesadilla. Cheddar has good flavor, but it’s too greasy on it’s own. Pepper Jack is a personal favorite but it’s too spicy for my kids. Typically, I like to go halvsies with mozzarella and cheddar since those two cheese are what I almost always have in the fridge.
  • But if I’m thinking about it at the store and want really good cheese for quesadillas, I go with queso asadero or oaxaca cheese, which are both more authentic choices for quesadilla cheese and have both good flavor and melting properties.


WHAT KIND OF TORTILLAS DO YOU USE FOR QUESADILLAS?

  • This is really personal preference since you can use either flour tortillas or corn tortillas for quesadillas. There are also lots of options for whole wheat tortillas or gluten-free choices, if you want.
  • We like flour tortillas best, although we do corn tortillas every now and then for a change.


INGREDIENTS

  •  4-6 large flour tortillas
  •  2 cups shredded cheese (a combination of mozzarella, cheddar, monterey jack, oaxaca, or asadero)
  •  1 cup black or pinto beans, rinsed and drained
  •  2 cups leftover shredded chicken (rotisserie chicken works great)
  •  1/3 cup chopped green onions
  •  1/4 cup chopped fresh cilantro
  •  1/4 cup vegetable oil or butter

INSTRUCTIONS

  1. Heat oil or melt butter in a large pan or griddle over medium heat.
  2. Working quickly, add 1-2 tortillas to the pan and sprinkle about 1/3 to 1/2 cup of the shredded cheese over each tortilla. Add 1/3-1/2 cup of shredded chicken, along with a couple of tablespoons of beans, and a generous sprinkle of chopped green onions and cilantro.
  3. Fold each tortilla in half on top of the fillings, then cook until golden brown on the bottom. Flip and cook on the other side until golden brown, the cheese is melted, and the fillings are hot.
  4. Repeat with remaining tortillas, cheese, and filling ingredients.
  5. Slice into wedges and serve with sour cream, guacamole, and pico de gallo or salsa.

EASY SPINACH STUFFED MUSHROOMS RECIPE

by
These spinach stuffed mushrooms are so easy to make and they are always a popular appetizer during the holiday season. Mushrooms are stuffed with a spinach, artichoke and parmesan filling and topped with breadcrumbs. 


Stuffed mushrooms are always a hit over the holidays, they are so full of flavor and dead easy to make. They are a great option when you are entertaining as they can be prepped ahead of time.

HOW TO MAKE THIS EASY SPINACH STUFFED MUSHROOMS RECIPE

  • Heat oven to 350°F and adjust oven rack to middle position.
  • Line a rimmed baking sheet with parchment or aluminum foil and set a wire rack inside (or covering the toand spray the rack with nonstick cooking spray.

FOR THE TOPPING:

  • Place bread, panko crumbs and Parmesan in a food processor fitted with the metal attachment. Pulse the bread 3-4 seconds. Drizzle in the oil and pulse 1-2 times. Set aside.

FOR THE MUSHROOMS:

  • Pat the mushrooms dry with paper towels.
  • Brush them lightly with melted butter and set them on the prepared baking sheet 1-2 inches apart. Set aside until filling is ready.

FOR THE SPINACH ARTICHOKE FILLING:

  • Heat large skillet over medium heat and add 1-tablespoon butter and 1-tablespoon oil.
  • When the oil/butter are heated (before butter burns), add onions and cook, stirring often, until onions are softened, 4-5 minutes.
  • Add artichokes and cook, stirring often, 4-5 minutes or until they have a lightly browned.
  • Add garlic, stir and cook another 30 seconds.
  • Add remaining 1 tablespoon butter and stir until melted.
  • Sprinkle the flour over the vegetable mixture and cook 1 minute, stirring continuously.
  • Slowly stir in the half-and-half, Parmesan, lemon juice, hot sauce, Worcestershire Sauce and salt.
  • Reduce heat to low and simmer, stirring occasionally, 3 minutes or until thickened.
  • Remove from the heat, add spinach and stir well.
  • Spoon the artichoke/spinach filling into the mushroom caps, packing down and rounding over the tops of the mushrooms.
  • Top the filled mushrooms with the topping mixture, pressing down lightly so the topping sticks to the filling.
  • Bake 20-25 at 350°F or until the tops are golden brown and mushrooms are cooked through.
  • Remove from oven, let rest 4 minutes and serve.

Enjoy!

TOP TIPS TO MAKE SPINACH STUFFED MUSHROOMS

  • Use white button mushrooms for this recipe. You could also make these in portobello mushrooms for a heartier appetizer.
  • Place the filling right to the bottom of the mushrooms.
  • Let the mushrooms cool ever so slightly before serving as they will be very hot!


INGREDIENTS
FOR THE TOPPING:

  • 1 slice hearty white bread torn into 4 pieces
  • 1 tablespoon panko bread crumbs
  • 1 tablespoon grated Parmesan cheese
  • 1 tablespoon olive oil

FOR THE MUSHROOMS:

  • 24 1½-2 inch diameter white button mushrooms, washed & stems removed
  • 2 tablespoons unsalted butter melted

FOR THE SPINACH ARTICHOKE FILLING:

  • 2 tablespoons unsalted butter
  • 1 tablespoon olive oil
  • ½ medium yellow or white onion diced
  • 9 ounces frozen artichoke hearts thawed, squeezed dry & chopped
  • 1 garlic clove minced
  • 2 tablespoons all-purpose flour
  • 1 cup half-and-half or cream
  • ¾ cup grated Parmesan cheese
  • 1½ teaspoons fresh lemon juice
  • 1 teaspoon hot sauce
  • 1 teaspoon Worcestershire Sauce
  • ½ teaspoon kosher salt
  • 5- ounces frozen chopped spinach thawed and squeezed dry

INSTRUCTIONS

  1. Heat oven to 350°F and adjust oven rack to middle position.
  2. Line a rimmed baking sheet with parchment or aluminum foil and set a wire rack inside (or covering the toand spray the rack with nonstick cooking spray.

FOR THE TOPPING:

  1. Place bread, panko crumbs and Parmesan in a food processor fitted with the metal attachment. Pulse the bread 3-4 seconds. Drizzle in the oil and pulse 1-2 times. Set aside.

FOR THE MUSHROOMS:

  1. Pat the mushrooms dry with paper towels.
  2. Brush them lightly with melted butter and set them on the prepared baking sheet 1-2 inches apart. Set aside until filling is ready.

FOR THE SPINACH ARTICHOKE FILLING:

  1. Heat large skillet over medium heat and add 1-tablespoon butter and 1-tablespoon oil.
  2. When the oil/butter are heated (before butter burns), add onions and cook, stirring often, until onions are softened, 4-5 minutes.
  3. Add artichokes and cook, stirring often, 4-5 minutes or until they have a lightly browned.
  4. Add garlic, stir and cook another 30 seconds.
  5. Add remaining 1 tablespoon butter and stir until melted.
  6. Sprinkle the flour over the vegetable mixture and cook 1 minute, stirring continuously.
  7. Slowly stir in the half-and-half, Parmesan, lemon juice, hot sauce, Worcestershire Sauce and salt.
  8. Reduce heat to low and simmer, stirring occasionally, 3 minutes or until thickened.
  9. Remove from the heat, add spinach and stir well.
  10. Spoon the artichoke/spinach filling into the mushroom caps, packing down and rounding over the tops of the mushrooms.
  11. Top the filled mushrooms with the topping mixture, pressing down lightly so the topping sticks to the filling.
  12. Bake 20-25 at 350°F or until the tops are golden brown and mushrooms are cooked through.
  13. Remove from oven, let rest 4 minutes and serve.


Enjoy!

SLOW COOKER BEEF TACOS

by
The most tender and flavorful slow cooker beef tacos. Simmering all day gives this taco meat an incredible texture. This is a super simple and utterly delicious meal, a real crowd pleaser! 


These are the ultimate slow cooker ground beef tacos! Easily made from scratch! Add your favorite toppings and guacamole on the side and your family will love you! This could quick become a family favorite. The beef is seasoned with a homemade taco seasoning but you can use store bought). It makes so much you’ll have enough meat for a few nights!

HOW TO MAKE SLOW COOKER BEEF TACOS

  • Place all ingredients in a slow-cooker set on HIGH heat. Break the ground chuck apart and mix well. Cook 4 hours, covered, stirring occasionally.
  • Spoon the meat from the slow-cooker, with a slotted spoon, into a large paper towel-lined bowl. Let the excess fat drain from the beef for 10 minutes then transfer the beef to a covered container and refrigerate.


Enjoy!

DO I NEED TO BROWN THE BEEF BEFORE SLOW COOKING?

  • You don’t have to. It comes out very tender, but can by a touch drier, so you can stir in a little taco sauce or picante sauce before serving. If you want you can add the beef to the skillet and give it a quick brown.   


CAN I USE PRE MADE TACO SEASONING?

  • Absolutely!  I love the flavor of homemade, but if you’re in a rush or don’t have all the spices on hand… packets come in handy!  You’ll need 2 packages for this recipe.


WHAT OTHER MEAT CAN I USE?

  • You can make this recipe using ground turkey for a lower-fat meal and it still tastes awesome! Ground chicken would work as well.


CAN I FREEZE SLOW COOKER BEEF TACO MEAT?

  • Once ground beef is fully cooked, place in a bowl and cool in the refrigerator. Once completely cooled, remove beef from the refrigerator and place in a freezer bag. If desired, separate into smaller servings and place in separate bags.
  • This is especially useful if you have cooked a large amount of meat or plan on only cooking for one or two people at a time. Squeeze out as much air as possible from the freezer bag and seal tightly. Store in the freezer for up to 3 months.
  • Thaw ground beef in the refrigerator overnight when ready to use.


TOP TIPS FOR SLOW COOKER BEEF TACOS

  • Make sure to break apart the ground beef and mix well.
  • You can swap in ground chicken or turkey.
  • Top with guac, sour cream, cheese and salsa.
  • Can freeze for up to 3 months.


INGREDIENTS

  • 4 pounds ground chuck
  • ¼ cup water
  • 1 16 ounce jar taco sauce or picanté sauce
  • 6 tablespoons about 3 ounces Homemade Taco Seasoning or your favorite taco seasoning
  • 1½ teaspoons granulated sugar optional

INSTRUCTIONS

  1. Place all ingredients in a slow-cooker set on HIGH heat. Break the ground chuck apart and mix well. Cook 4 hours, covered, stirring occasionally.
  2. Spoon the meat from the slow-cooker, with a slotted spoon, into a large paper towel-lined bowl. Let the excess fat drain from the beef for 10 minutes then transfer the beef to a covered container and refrigerate.
  3. If not using within 3 days, transfer to freezer bags and freeze up to 3 months.

Enjoy!
NOTES

  • Makes 6-7 cups.
  • To make tacos, you'll need taco shells, diced tomatoes, shredded lettuce, shredded cheese, diced onion, chopped cilantro, and whatever else you love as taco toppings!